The Visual Form Designer is a tool to create and maintain FORMDef statements that define your Forms. Using this tool you don't have to go in the details of constructing a FORMDef statement, you just drop controls in your Form, resize them, move them, change their properties or delete them and finally the new or modified FORMDef statement is automatically generated for you. Then you can paste it in your code and continue your work as usual.
To generate the FORMDef statement of a new Form you activate VFD and you start with a blank Form. You resize it in the desired dimensions and you start dropping controls on its surface. When your Form is ready you press a button and the FORMDef statement is created and copied to clipboard. Then you can go in your code and paste it normally there.
To modify an already existed Form you select and copy in the clipboard the FORMDef statement in your code, activate VFD and pressing a button in the toolbar you import the statement. Then you get a visual representation of your Form in the design area of the tool and you are able to edit it. When you have finish all the modifications you can generate the new FORMDef statement and replace with it the previous in your code.
NOTE: If you do modifications in the FORMDef statement by hand, avoid to make it depended to other symbols in your code (local constants) because you will not be able to import it in VFD later. VFD cannot see symbols private in your code.
You can activate VFD pressing ![]() in the main toolbar or F6.
in the main toolbar or F6.
In the picture below we can see the four section that comprise VFD window.
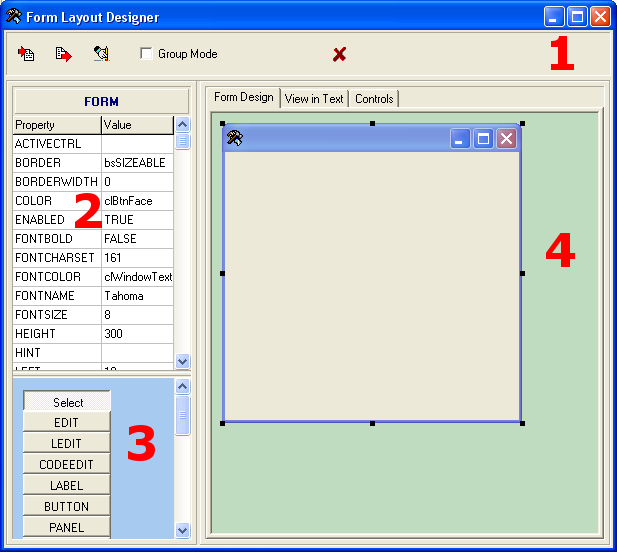
Toolbar (at the top) contains four buttons
Properties editor is in the left. Lists the properties of the selected Control or Form. Properties editor is comprised by two columns. The first contains the property name of every listed property and the second its current value. The user can directly change the values. Many properties they have drop down list boxes for easy and accurate value selection.
The Control's palette is below Properties editor. In the form of buttons contains all the controls the user can "drop" in his/her Form. You can press the button of the Control you want to add in your Form and click in the position in your Form where you wish to place it. After the Control is dropped its selection button goes up again and the button "Select" appears pressed. This button doesn't represent a control. When it is pressed you can click on any already placed Control in your Form and select it. This selection makes you able to edit Control properties, move it, resize it or even delete it.
It is in the right and it is comprised by three TABs that show a different view of your Form.
In the design view there is a WYSIWYG editor for your Forms. They look in this editor the same as they will look in a running code. As we have said already you press a Control's button in Controls palette and then you click in the specific point in Form's area where you wish to drop it. Also when the "Select" button is pressed you are able to click on a control and select it. Every selected control is surrounded by eight small black grabber rectangles. These grabbers denote the selected control and can be used to resize it in any direction using the mouse. When you click on a Control and select it, the property editor is updated with its properties list and you are able to change their values.
Pay attention to the prNAME property found in all control types. This property contains the unique Control ID, that is the only mean to identify it in EventProc routine which accepts events from all controls in the Form (and probably for more than one Forms). VFD, when a new control is dropped in the Form, generates automatically a unique ID for you in the form of ID## where ## represents a numeric value (e.g. ID100). If you wish you can change this ID to something that is more close to the control's role in your Form.
When CTRL key is pressed then clicking a Control (in the design area) adds it in a group. The already selected Control is always added first in this group. You can see this group from the grabber rectangles surrounding each Control belonging in the group. The first Control (the selected) is again in black grabbers as usual but the rest of Controls will appear with gray grabbers. A Control already selected in the group can be deselected if click on it again with CTR key pressed. Clicking in any other place other than the selected Controls, the group is destroyed. Note that only Controls that belong to the same container Control can be added to the group.
When a group of control is set then a number of operation can be applied to all of them. You can move the group of Controls with the mouse or delete all these Controls at once. You can copy/cut the group to the clipboard and paste it to another container control or Form.
Also some operations can be executed that affect the size and position of the Controls of the group according to the size and position of the first in the group. You can get these operations with a right click of the mouse. Will appear the following popup menu:
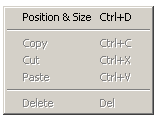
Choosing "Position & Size" from the menu is displayed a dialog with two pages, one for handling position operations over the group Controls, and one for handling sizing operations.
The operations for the position page are:
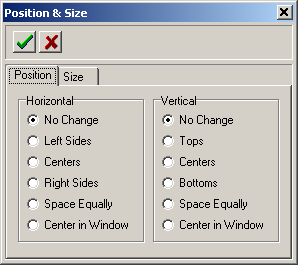
| Operation | Description |
| Left Sides | Controls are left aligned regarding the position of the first in the group. |
| Right Sides | Controls are right aligned regarding the position of the first in the group. |
| Tops | Controls are aligned regarding the top of the first in the group |
| Bottoms | Controls are aligned regarding the bottom of the first in the group |
| Centers | Controls are centered according the center of the first in the group (Horizontally or Vertically) |
| Space Equally | The space between the controls of the group (Horizontally or Vertically) is distributed equally |
| Center in Window | The whole group is centered (Horizontally or Vertically) in the Window of the container Control or Form. |
The operations for the Size page are:
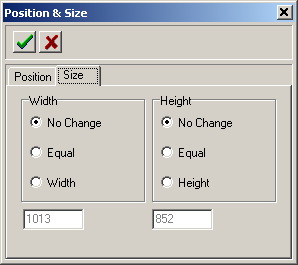
| Operation | Description |
| Equal | All Controls get the same width or Height as of the first in the group |
| Width | All Controls get the size entered in the edit box below |
| Height | All Controls get the height entered in the edit box below |