Even CalcIt developed originally as an Expressions Calculator now is mostly a Coding/Programming tool. Its purpose is to write, store and organize generally small pieces of codes that can be used to help/support the every day work. Its language is designed to be easy to learn and understand and it is specifically focused in the processing of numeric and alphanumeric data and text files and helps to program fast and with the less possible debugging. Its model of usability is the interactive programming, meaning with that that at any stage of your code development you have a convenient place to print program results and see if it works ok and then continue to the next stage. So in this way your program is tested in small pieces of code progressively.
CalcIt user interface serves in three areas:
CalcIt besides to be a coding tool remains also a Calculator. Its user interface is divided to serve these, some times intercrossing, operations.
CalcIt user interface has a toolbar at the top and below in three TABs where one can code CalcIt applications (Applications), quickly and efficiently to make any calculation (Calculations) and last to write any code in form of functions or Classes for general use and so expanding CalcIt's standard command set (Library).
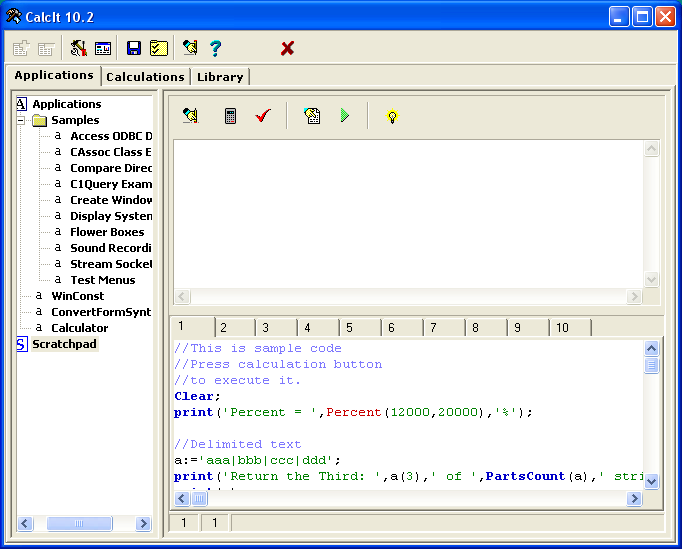
In Applications Page you write, store, organize and run your Application codes. There are two parts. At left is a hierarchical list which serves as an index and directory for your codes. You can click at any item in the list and select it. Every selected item appears in the right side where you can enter its code or modify it using a Code Editor. Above the editor there is an output window where your Code results can be printed.
There are two root entries in the hierarchical list.
Under "Applications" we create, edit or modify pieces of CalcIt code ("Applications") that can be executed immediately. When an Application is created or selected for modification or execution then at the right appears a toolbar, the Output window and the code editor containing Application's code.
The buttons in the toolbar are:
Clears Output Window (as command Clear does)
Run Code
Enter code in Debugger window to set/unset breakpoint.
Runs code in debug mode.
Brings the screen to create an independent executable file (.exe) for the selected Application.
Manage Applications sub tree:
- Create New Application. Press
in the main toolbar when the root item "Applications" is selected or any Application item. A new entry with the name "New Application" will be inserted in the list. Right Click on the "New Application" and in the popup that will appear choose "Rename". Change the name of the Application directly on the tree list. At the right, in the code editor, enter the code of the Application.
- Edit Application. Click on the name of the Application in the list. At the right the Application code will appear in a code editor. You can modify the code.
- Delete Application. Click on the Application to be deleted. Press
in the main toolbar.
- Folders can be created the same way as it is describe in Functions. See below.
See also CalcIt Language.
Scratchpad is a place where fast and easily we can write and run a piece of CalcIt code. In many ways Scratchpad works similar to Applications. At the right section appears the same toolbar and below it the Output window. At the bottom we found a set of 10 code editors selected by tabs. We select one of these editors, we write or modify code and run it immediately.
The Scratchpad toolbar works the same as in Applications above for the code of the currently active code editor.
Scratchpad is a convenient place to be used for quick calculations as well.
See also CalcIt Language.
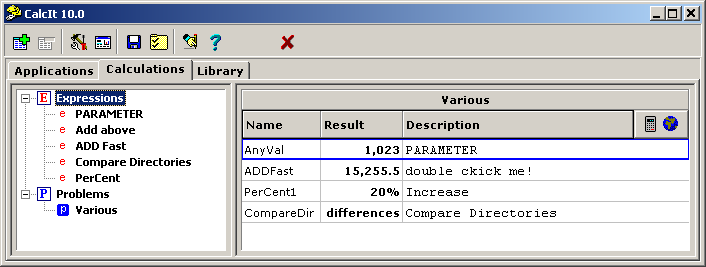
This is the place to use CalcIt as a Calculator. The use of CalcIt as a Calculator is a bit different than you might expect but offers greater versatility and control than any usual calculator user interface. We have three things to define: Expressions, Problems and Calculations.
Calculating Page is divided in two parts. At left is a hierarchical list to create, store and maintain Expressions and Problems. At the right appears the list of the Calculation items contained in the currently active Problem.
Expressions is a kind of parameterized piece of CalcIt code much like a UDF is. Parameters of Expression items can be only simple variables, that is, cannot be array or automation Objects, Forms, Files or Buffers. Also can be only IN parameters (by value). Expressions can be organized in folders in the tree list.
Managing the Expression List
- Create New Expression. Press
- Edit/ Modify Expression. Double click on an Expression item. A special Form will be invoked to edit/modify the item.
- Delete Expression. Click on the Expression to be deleted. Press
to delete the Expression.
- We can create folders in the Expression sub tree. Is the same as in the Functions list.
Problems represent a group of Collaborating Calculation items that serve the same computation purpose or belong in the same category. Selecting a Problem we activate at the right the list of owned Calculation items.
Managing Problems List
- Create New Problem. Press
- Edit Problem details. Double click on the Problem in the list. A special form will appear to change its details.
- Delete Problem. Click on the Problem to be deleted. Press
Calculations are items that really permit to enter values and execute calculations. They are listed in a flat list at the right of the Calculating Page. A Calculation always belongs to a Problem and to execute a specific Calculation we have to activate the Problem it is contained selecting it in the list.
Every Calculation appears in the Calculations list as a line of three columns as follows:
- Name. Every calculation in a Problem is defined by a unique name (or ID) the user gives to it. It helps as a brief description of its purpose and also another Calculation can access the result of another using this Name. Any Calculation with name, say, "A" can refer to any other Calculation with name, say, "B" (in the same problem) only when "A" is below "B" in the list.
- Result. Every Calculation returns one value (as any CalcIt code), usually numeric. This result appears in this column and it is always right justified.
- Description. The user can enter a text description for any Calculation. This text can be defined by hand entering its value in a special form or can be defined programmatically using special CalcIt Language commands (MSG, DESCR). In the second case the content of this column can change every time the Calculation is executed with different values to comment adaptively the returned result or acts as a secondary result column of any formatting the user chooses.
To execute all Calculations in the list press F10 or
at the right-top of the Calculations list Window.
Managing Calculations List
- Create New. Using
in tool bar when the right window is active (selected any item on its list) a special form appears to enter the Calculation Name and the Expression will associate with it. Alternatively you can drag & drop an Expression in the Calculations section at the right.
- Enter Values\Execute. We select an already existing Calculation and double click on it or press F2. A special form appears where the user can enter values for the parameters of the associated expression and execute the Calculation to get its result.
- Delete. We can select a Calculation and press the
- Move in the list. We can move a Calculation in any place in the list using drag & drop. The place of a Calculation in the list is important if it has to refer to the results of other Calculations because it can do that only for Calculations above it in the list.
- POPUP menu.
Edit Calculation (F2) Brings the Calculation's Edit\Execution form Edit Options Brings Calculation's Options form Set default Options General Options settings are applied (if user has change them) Copy Name Copies the Name of the selected Calculation in the clipboard. This is useful when we need to refer to a calculation from another. Drag & drop can also be used to place the name of a Calculation in another's parameters. Copy Result Copies the result of a Calculation in clipboard. This is useful when we need to pass a result in another application. Reset Calculation(s) All Calculation's parameters take the default values (defined in the Expression) or 0 if there is not one. Copy Problem Creates a duplicate of a problem Print Problem Prints the active problem Debug (F8) Executes the selected Calculation in debug mode. Starts debugging. NOTE: At Calculation list we can select more than one items (for example to delete them all) keeping pressed the CONTROL key and right mouse button. One click in an element selects, another deselects and so on.
Here code is stored in the Form of User Defined functions or Classes. Is a repository of reusable code to any other CalcIt places where code can be written. Also provides a place to store constant values that can be used everywhere. At the right is a hierarchical tree like in the previous two TABs. There are three root items. Functions, Classes and Constants.

Under "Functions" we create, edit or modify User Defined Functions (UDF). UDFs is the simplest way to extend CalcIt's command set with functions written in CalcIt language. When a UDF is created or selected in the list for modifications then at the right appears a code editor.
For every UDF we have to define its name and its parameters interface. At the right, under Edit/Create Functions we add or modify the function's name. Below is a code editor where we write its code. Function's parameter interface can be defined in two ways:
- Automatically. Every variable which is used in the code without first assign to it a value with the assignment operator (or used as FOR variable or passed in a IN/OUT function call parameter) becomes part of the parameters list. In this way we cannot define the order of the created parameters which is decided by the order of their appearance in the code. Also all parameters are IN parameters and cannot be Arrays or Automation objects.
- Via command extern. Using this command we explicitly define the parameters of UDF. Also we can define IN/OUT parameters and also Array or Automation Object parameters. Note that if some variables are not defined in the extern command and are used in the code before a value is assigned to them with the assignment operator then these variables will be added in the parameters list.
In the editing part of a UDF there are two buttons.
. Compiles the code and if the code is syntactically correct, constructs UDF's parameters list.
Every UDF appear in the list with its current parameters list.
Manage Functions sub tree
- Create New Function. When the Function root item is selected or any function item in the Function sub tree, press
in the main Toolbar. Add the Function's name at the right under "New Function" and enter its code in the code editor. The function will be added and evaluated every time you click in another item in the list or press
.
- Edit/Modify Function. Click on the name of the Function. At the right the function appears. You can change its name or code. To save, as above.
- Delete Function. Select the Function to be deleted. Press
- To create a folder right click in any place the folder has to be created. In the popup menu that will appear select "New Folder". The folder will be created with the name "folder". Right click again on the folder name and choose "Rename". Now you are able to rename the folder directly on the list.
- Delete folder. To delete a folder the folder must be empty. If it is empty then right click on the folder and in the popup menu choose "Delete Folder".
- Move items in the list. We can move an item in the list using drag & drop.
- Move Up / Move Down. The selected function or folder is moved one position up/down, at the same level.
- Make First / Make Last. The selected function or folder becomes first/last item at the same level of the list.
- Sort. The items (folder or function), at the same level as the selected, are sorted alphabetically with no case sensitivity.
See also CalcIt Language
Under "Classes" we create, edit or modify Class definitions. Class definitions are used to create Class variables via the SET command. Classes is another way to extend CalcIt command set with user code but are more powerful and versatile and permit the creation of useful libraries for various purposes in CalcIt. Class definitions are edited the same way as a UDF described above. The only difference is the way they appear in the list. All public functions or properties (defined in the Class) are listed below Class definition name. The user can click in any of them to easily locate their start in the code. The Class definition name appears, in the list, with the parameter list of the constructor.
The sub tree of Classes is managed the same way as in the case of Functions above.
See also CalcIt Language and Using Classes and Class Variables.
Selecting the Constants item in the tree list we activate at the right a code editor where we add all of our global constants. Global constants are created or edited using a very simple syntax. This syntax does two things:
- Defines the constants and their values.
- Organize the constants in folders.
See an example:
Folder 'Calendar'

   Months='January|February|March|April|May|June|July|August|September|October|November|Desember';

   Days='Sunday|Monday|Tuesday|Wednesday|Thursday|Friday|Saturday';

  end;
Folder 'Financial'

   Tax=18;

   Interest=5;

   Profit=10;

  end;
Using command "Folder" we can create a folder with a name specified at the right (in single quotes). With command "end" we close a folder. Inside a folder other folders can be created in any needed nesting level.
Constants will appear in the list in the same way they are entered in the code editor with folders and sub folders.
We can locate a constant or a folder easily by clicking its name at the tree list.